The manual data entry tools in WooCommerce are well-designed for entering and maintaining data on individual products but not for larger-scale activities such as:
- importing product data from suppliers
- applying updates from suppliers
- performing bulk edits
In this article, we’ll show you how to do all of these tasks using the WP All Import/Export plugins.
To follow along, use this free online sandbox and select WooCommerce Store as the demo type.
Importing Product Data from Suppliers
A product supplier has sent you this download URL for a list of new products for your store: https://drive.google.com/uc?export=download&id=1K2JzqmCZVEQfyi-iyRJZRoKJYexICRwH.
Let’s have a quick look at the file:

As you can see, this list contains only five new products. These are all simple products, but WP All Import also handles all other WooCommerce product types.
The import columns are simple text or numeric fields with two exceptions:
- The Content column stores HTML for the product’s full description.
- The Image URL column online image addresses.
Let’s import these into WooCommerce.
Step 1: Create a New Import for WooCommerce Products
Navigate to All Import -> New Import in the WordPress menu:
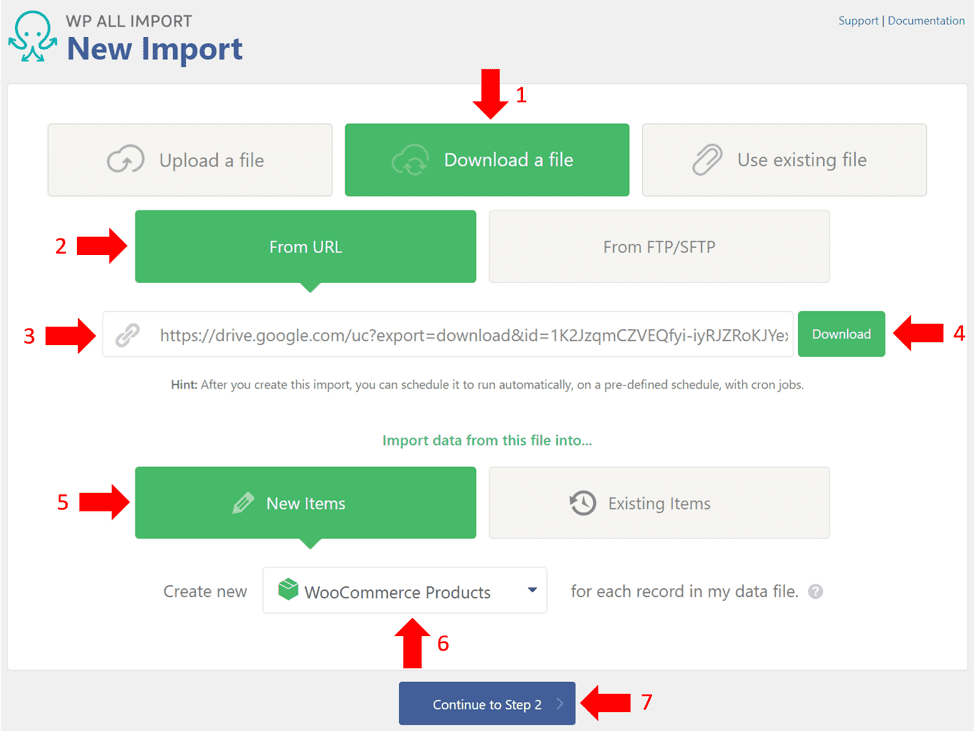
- Select Download a File.
- Select From URL.
- Use this URL: https://drive.google.com/uc?export=download&id=1K2JzqmCZVEQfyi-iyRJZRoKJYexICRwH.
- Click Download. WP ALL Import will verify that the file is suitable for importing.
- If the file verification is successful, select New Items.
- Select WooCommerce Products.
- Click Continue to Step 2.
Step 2: Review the Incoming Data
You can use the Review Import File screen to confirm that WP All Import has correctly interpreted the incoming product data:
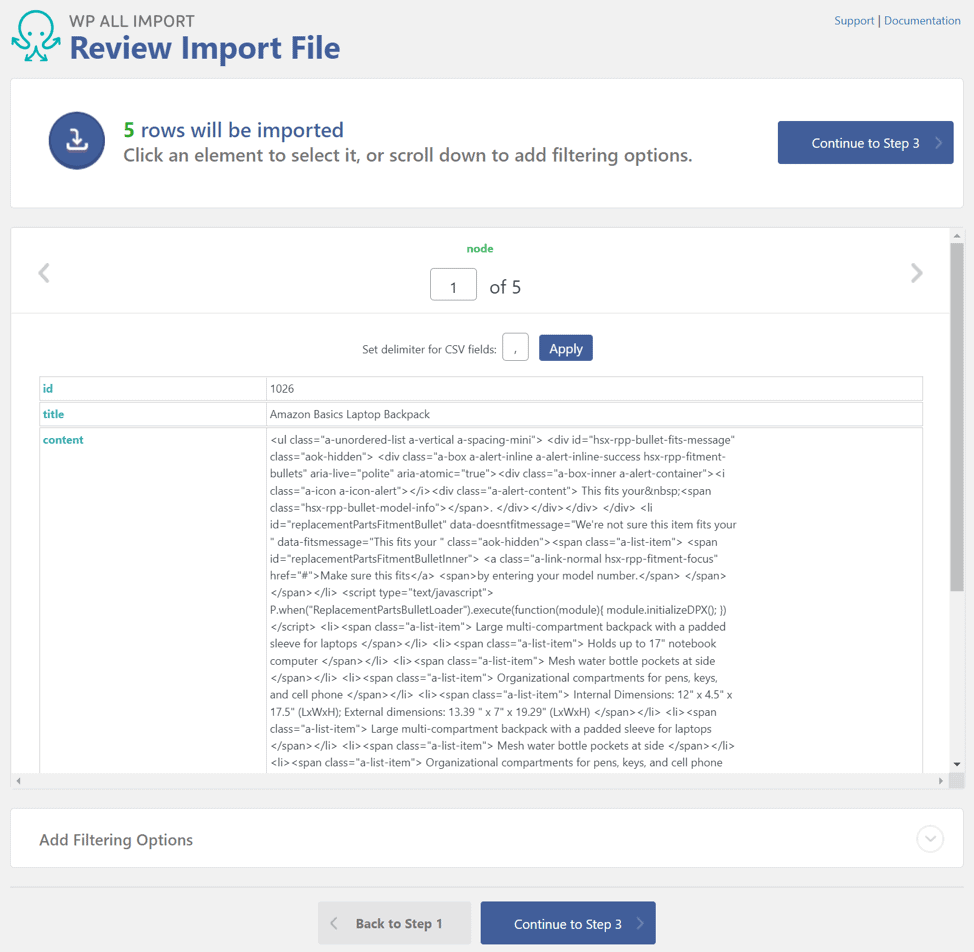
There are five records in this file, and they appear to be correct.
Click Continue to Step 3.
Step 3: Map the Incoming Data Columns to the WooCommerce Product Fields
The Drag & Drop screen lets you tell WP All Import where incoming data should be populated in the WooCommerce data structures:
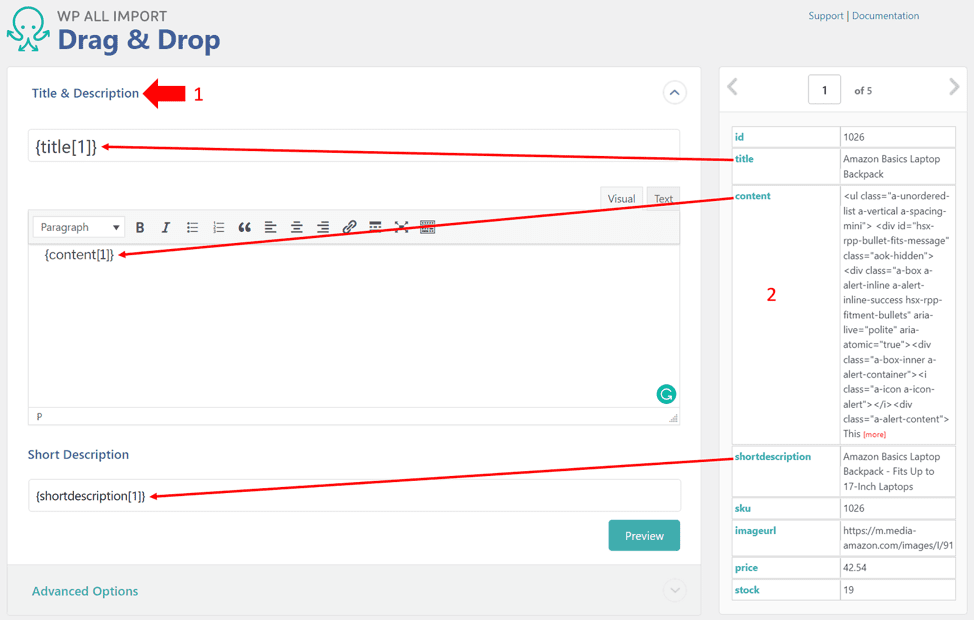
- Expand the Title & Description section.
- Drag the incoming title, content, and shortdescription data elements to their corresponding WooCommerce fields.
Collapse the Title & Description section and…
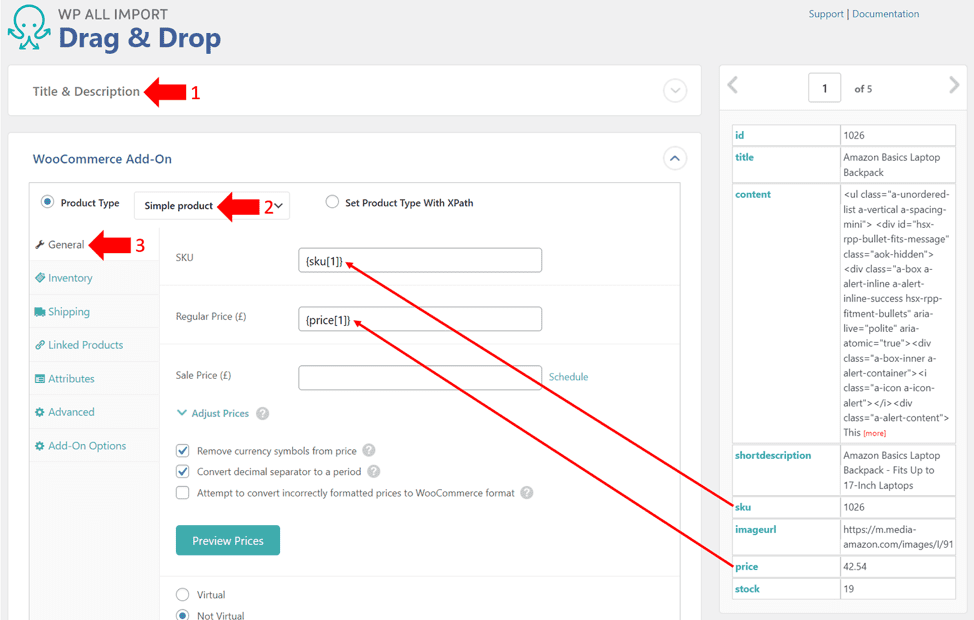
- Expand the WooCommerce Add-On section.
- Set the Product Type to Simple product.
- Switch to the General tab.
- Drag the sku and price incoming data elements to the WooCommerce SKU and Regular Price fields.
Next…
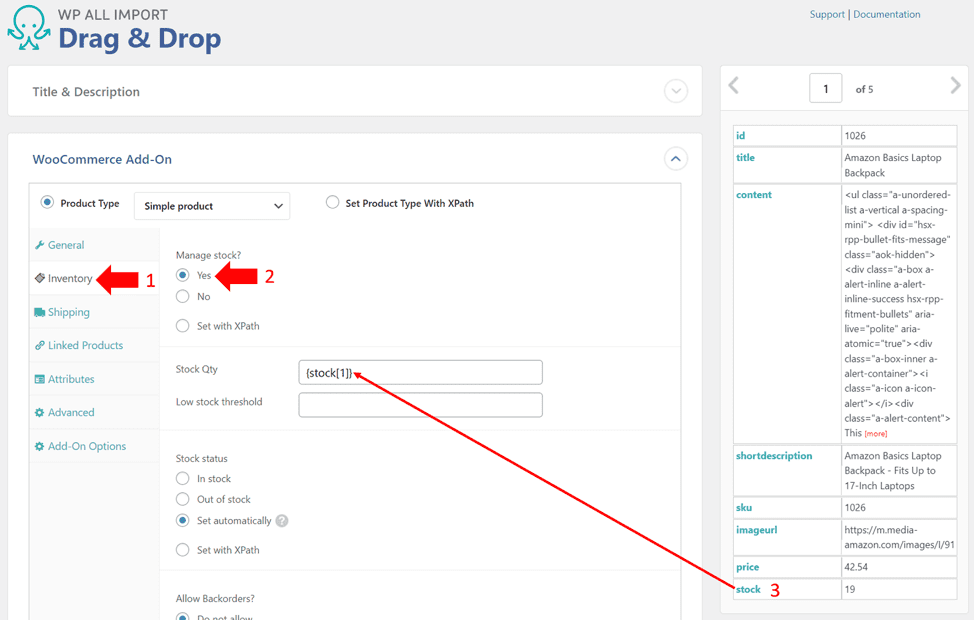
- Switch to the Inventory tab.
- Set Manage stock? to Yes.
- Drag the incoming stock data element to its corresponding WooCommerce field.
Collapse the WooCommerce Add-On section and…
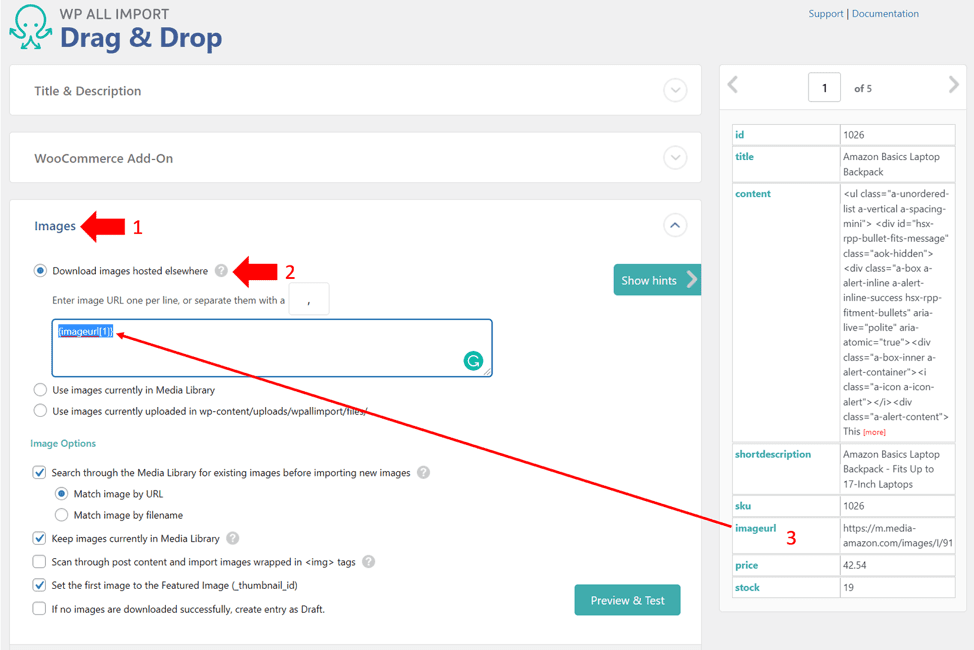
- Expand the Images section.
- Select the Download images hosted elsewhere option.
- Drag the imageurl incoming data element to the URL edit box.
Click Continue to Step 4 to navigate to the Import Settings screen:
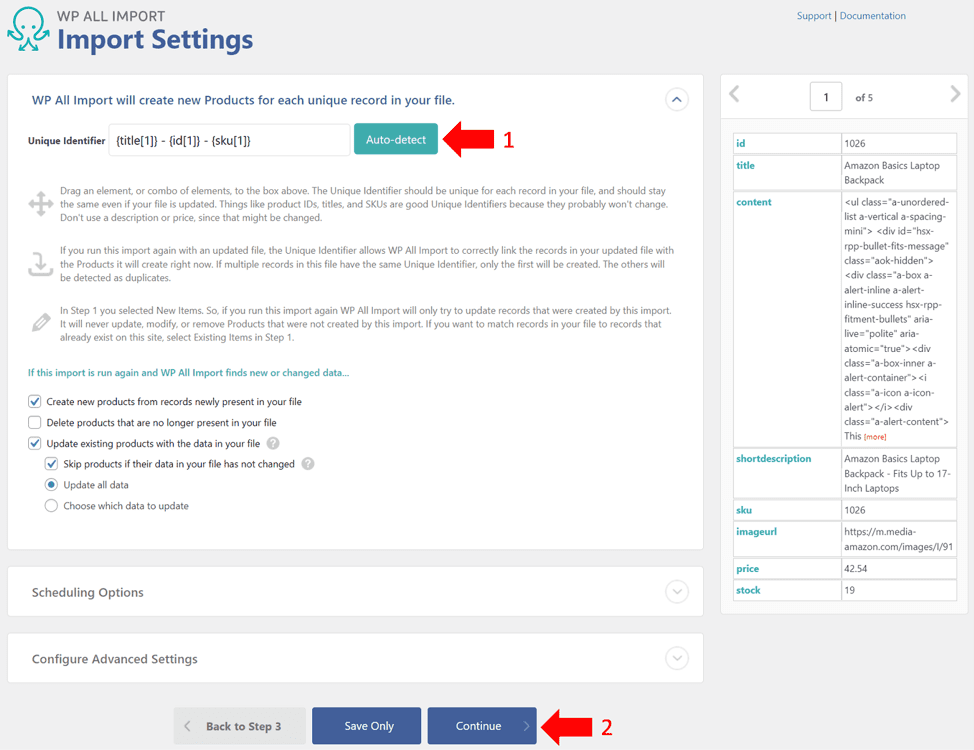
- Click Auto-detect. This generates a unique identifier for each new product.
- Click Continue.
Next up is the Confirm & Run screen:
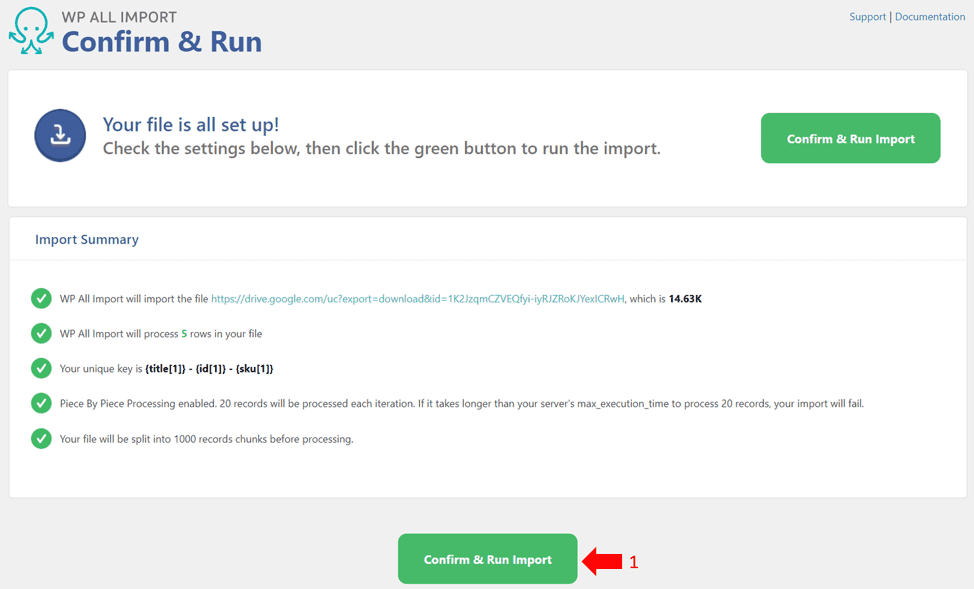
- All the checkmarks are green, so click Confirm & Run Import.
This starts the import. When it completes, WP All Import will respond with this screen:

Let’s verify that everything worked as expected. Navigate to Products -> All Products.
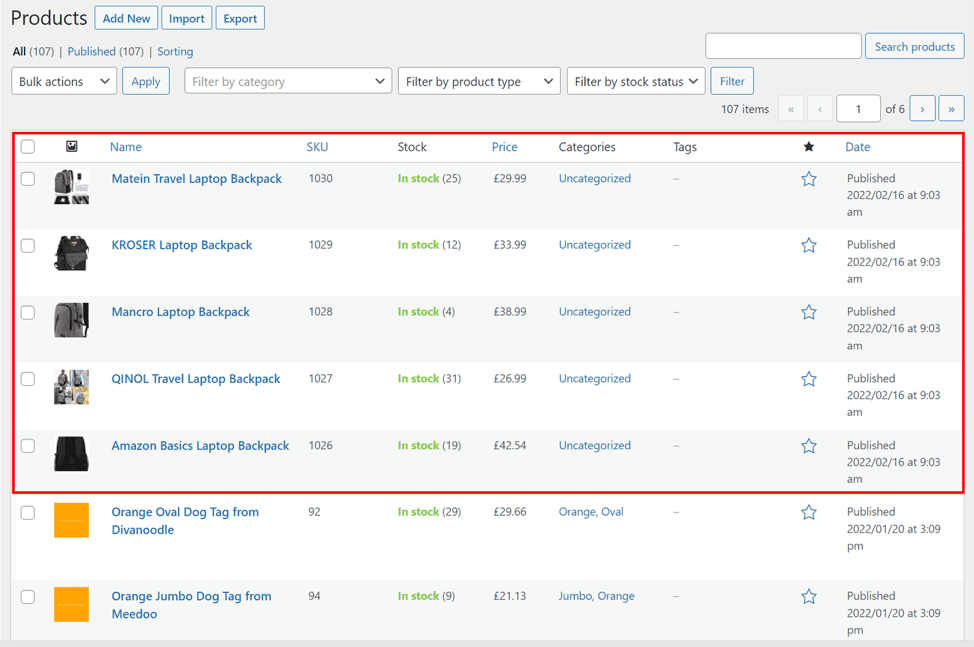
As you can see, you now have five new products that appear to have the correct information.
If you view one of the products in the Sandbox (i.e. hold your mouse over the Name field in the above list and then click the View link when it appears), you will see that all the other data appears to be correct, too:

For more information, see Import WooCommerce Products from any XML or CSV.
Updating Supplier Product Data
Imagine that the same supplier sends you an updated product file at https://drive.google.com/uc?export=download&id=1gW4jURi5RFR2f_WYrWgUgk0obB0XAIqg
In this updated file, the content has changed as follows:

Note the following:
- There are many price and stock changes.
- Product ID = 1028, Mancro Laptop Backpack, has been
- Product ID = 1031, Laptop Bag for Women, has been added.
What do you need to do to adjust the information in your WooCommerce store to reflect these changes?
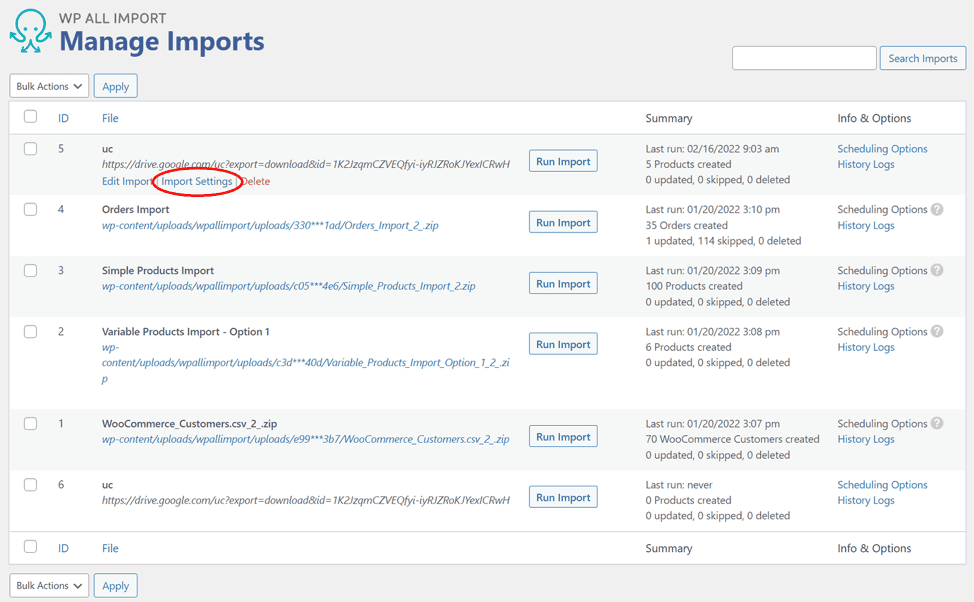
First, go to All Import -> Manage Imports, hold your mouse over the row at the top (i.e., the import that you just ran), and click the Import Settings link:
In the Import Settings screen, do the following:
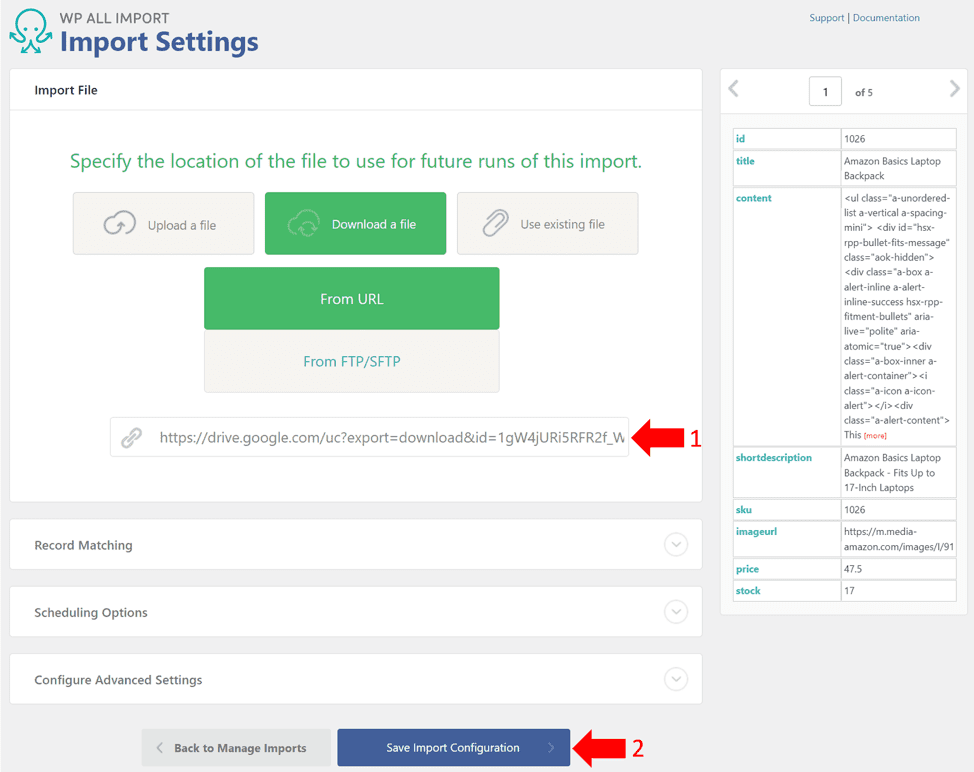
- Change the import URL to point to the updated file: https://drive.google.com/uc?export=download&id=1gW4jURi5RFR2f_WYrWgUgk0obB0XAIqg.
- Click the blue Save Import Configuration button at the bottom.
Back in the Manage Imports screen, on the row representing your original import, click the Run Import button:
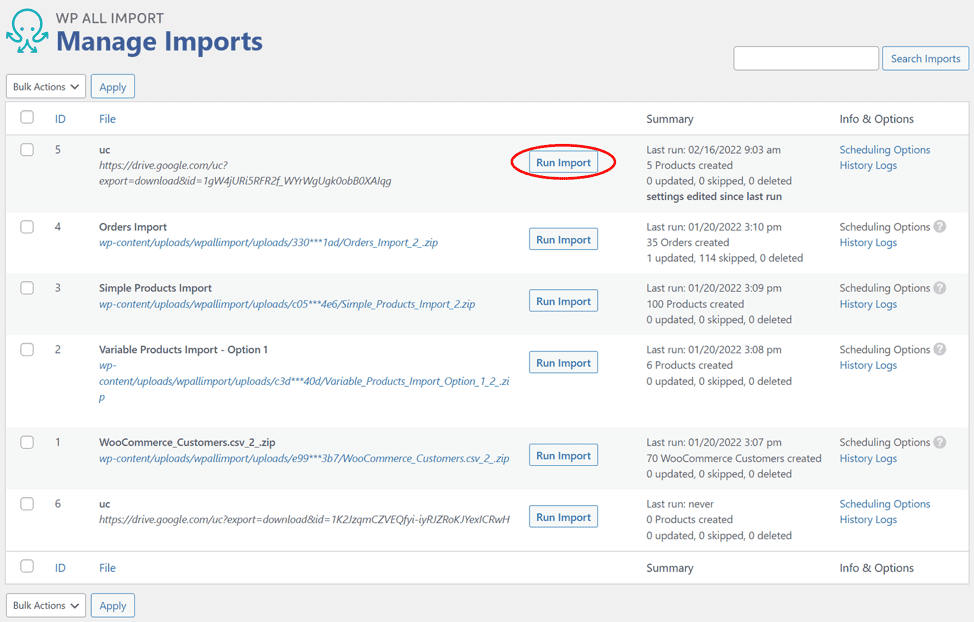
In the Confirm & Run screen, click the Confirm & Run Import button.
When the import has finished, navigate again to Products -> All Products:
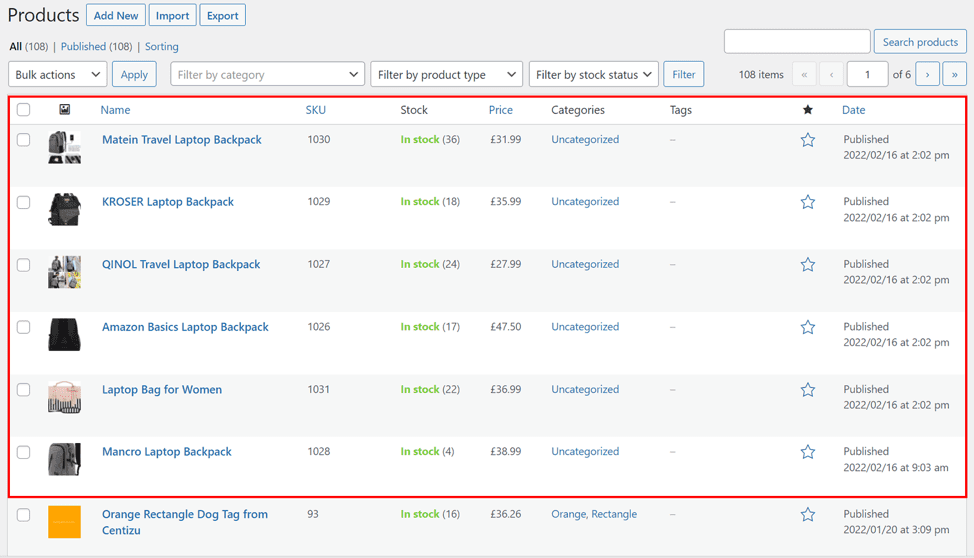
SKUs 1026, 1027, 1029, and 1030 should all have changes to their stock and price. And you should see the new product entry for SKU = 1031.
But what about SKU = 1028, i.e., the product that was excluded from the update file? In its default mode, WP ALL Import did not delete this product.
However, it allows you to manage the update process at a far more granular level than this. To see how to go back to the Import Settings screen and expand the Record Matching section:
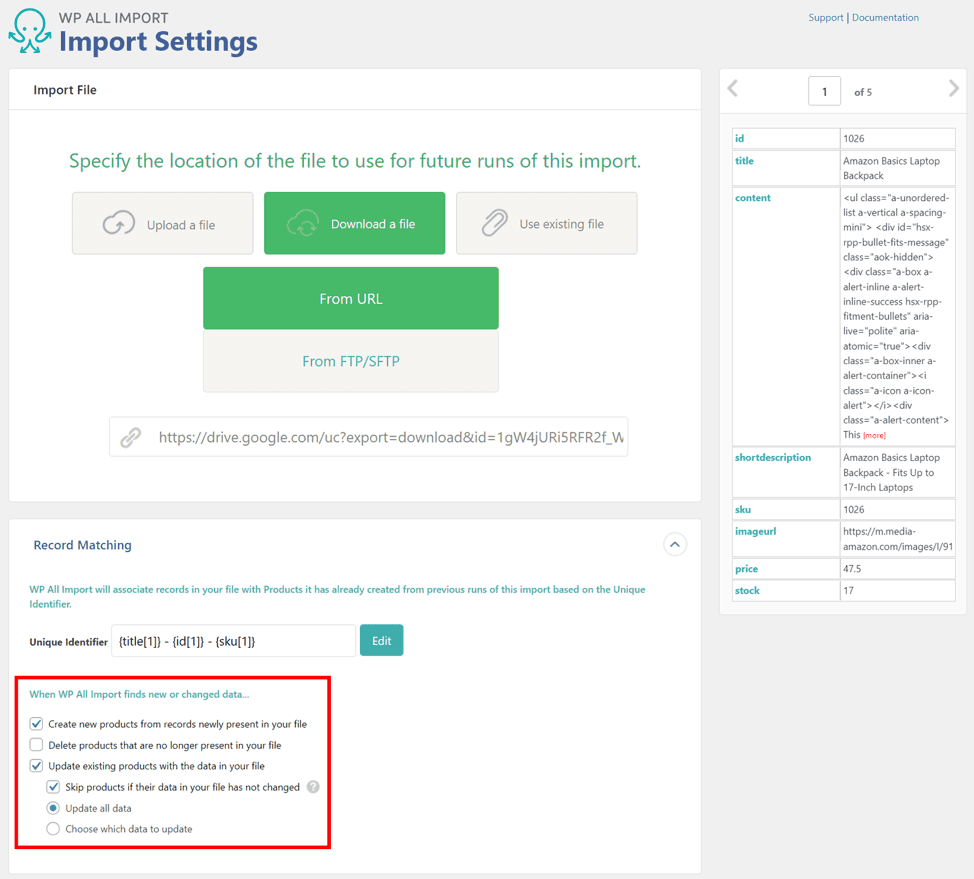
Look at the second option under the When WP All Import finds new or changed data… subsection. If you check this option, WP All Import will indeed delete existing products that are not present in the import file.
For products that are present in the file, the system will also allow you to choose the fields to update. To see this, select the Choose which data to update option near the bottom and check out the settings that appear for many fields.
Demonstrating these settings is beyond the scope of this article, but WP All Import can handle every update task from a single-click process for simple updates to the most complex updates imaginable.
For more information on common product update tasks, see Syncing Stock Levels and Updating Prices.
Bulk Editing Product Information
Changes to multiple products do not just come from suppliers. Sometimes, store owners may want to make bulk changes to many products on their own.
For example, imagine that you have decided to offer a 25 % discount on all products in your store with a price range between $20 and $30. Additionally, you decide to temporarily add “SALE – ” to the beginning of their product titles.
If you enjoy long, dreary data entry tasks, you can do this manually. Or you can have WP All Import do most of the work for you, as we demonstrate next.
Step 1: Export the Product Data
Click All Export -> New Export to start a new export:
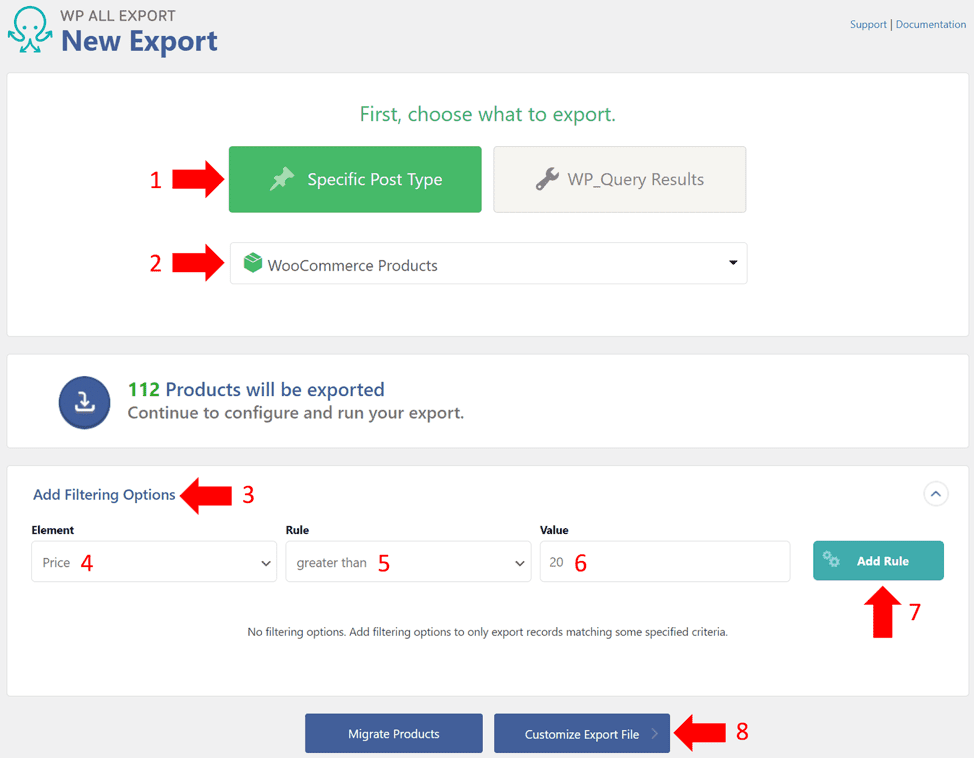
- Choose Specific Post Type.
- Choose WooCommerce Products.
- Expand the Add Filtering Options
- In the Element field, select Price.
- In the Rule field, Select greater than.
- In the Value field, enter “20”.
- Click the Add Rule This will apply the rule, leaving 56 products with a price greater than 20.
Next steps:

- Repeat Steps 4 to 7 from the previous list, but this time use the less than rule and enter “30” in the Value field. This should leave the filter section of your screen matching what you see in the red rectangle above. In our test data, 24 products match these conditions.
- Click Customize Export File.
The Drag & Drop interface allows you to choose the columns in your export:
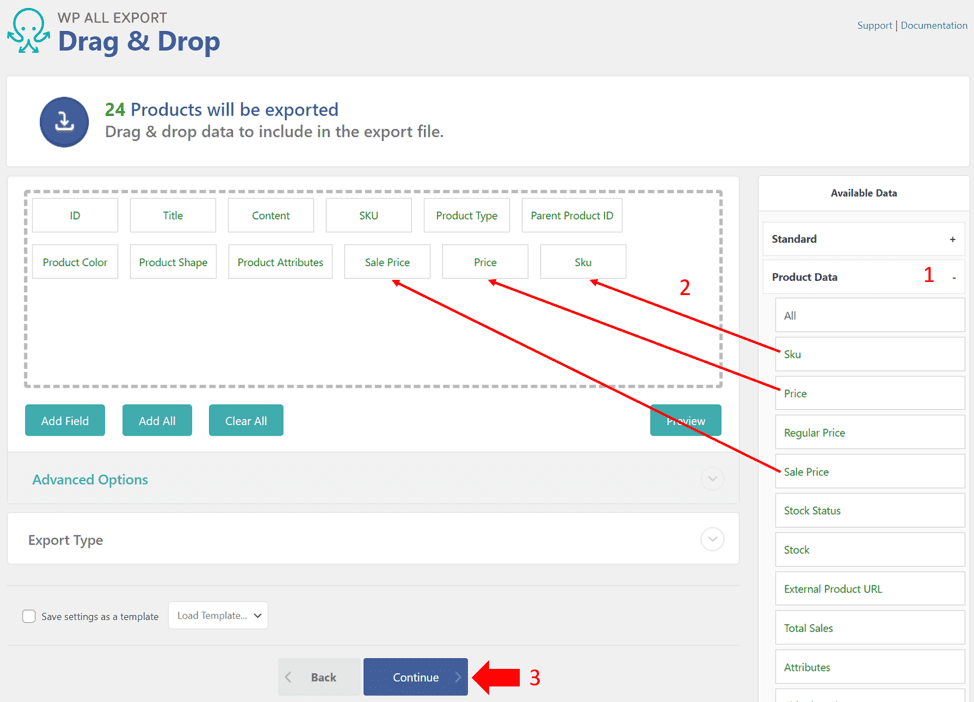
- Expand the Product Data group in the Available Data
- As shown above, drag and drop the Sale Price, Price, and Sku fields into the column selection area. Note this interface has far more advanced capabilities than just drag & drop. You can also define custom fields using PHP.
- Click Continue.
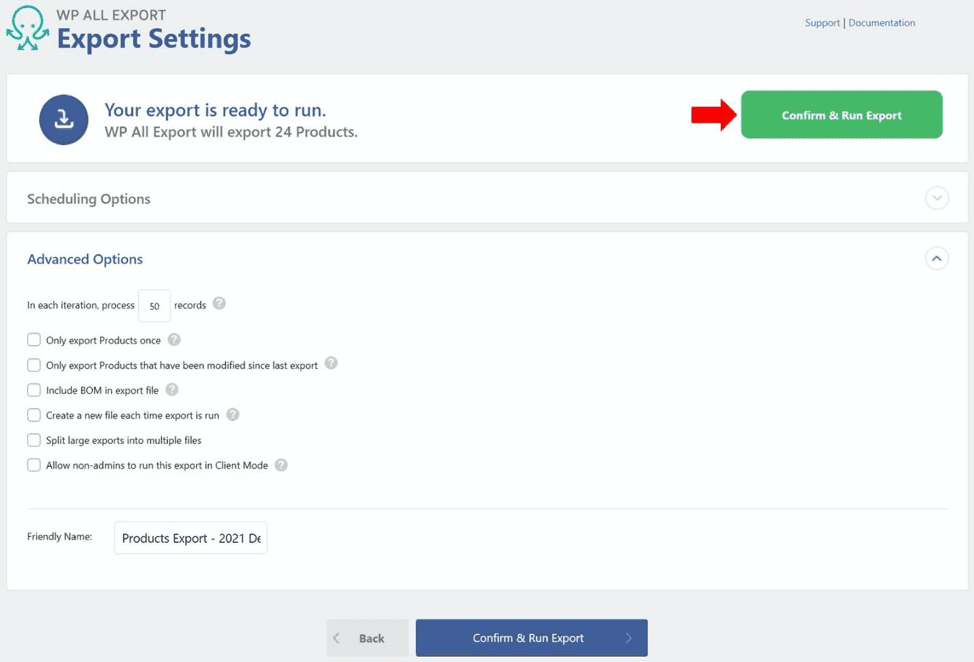
The Export Settings screen lets you control scheduling and other advanced options. In this case, just click Confirm & Run Export.
In the Confirm & Run screen, click the blue CSV button in the lower center of the screen:
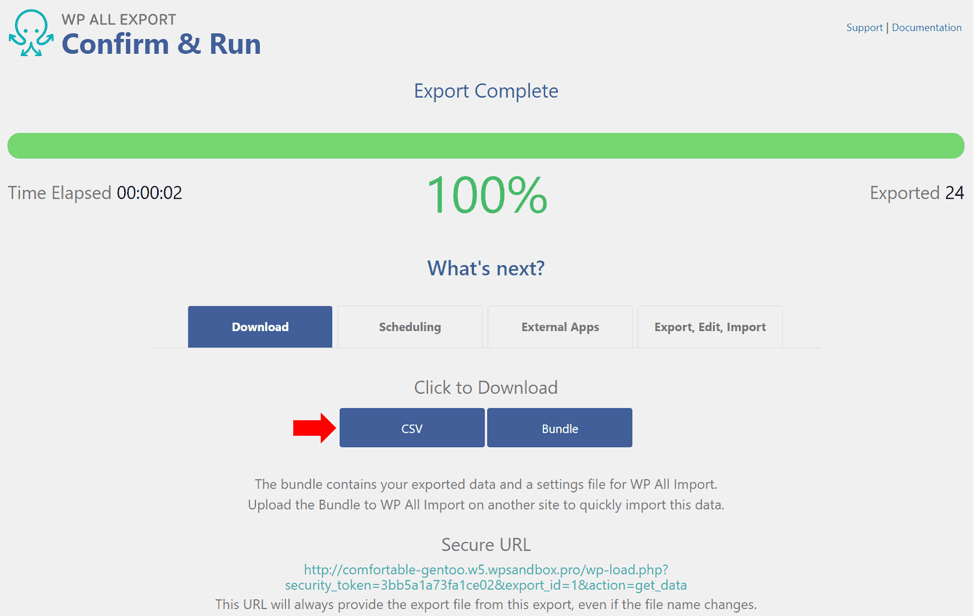
This will download your export file.
Step 2: Use a Spreadsheet to Edit the Product Data
Use a spreadsheet to open the export file, then perform these tasks:
- Add a column beside the Title column.
- In the first data row of your new column, enter ‘= “SALE – “&B2’. Make sure to include the double quotes. This is the formula for Microsoft Excel. You may have to modify it for other spreadsheets. When applied, this formula will create a Title such as, “SALE – Red Square Dog Tag from Twitterworks”.
- Copy and paste this formula to all the rows so that your spreadsheet looks like this:
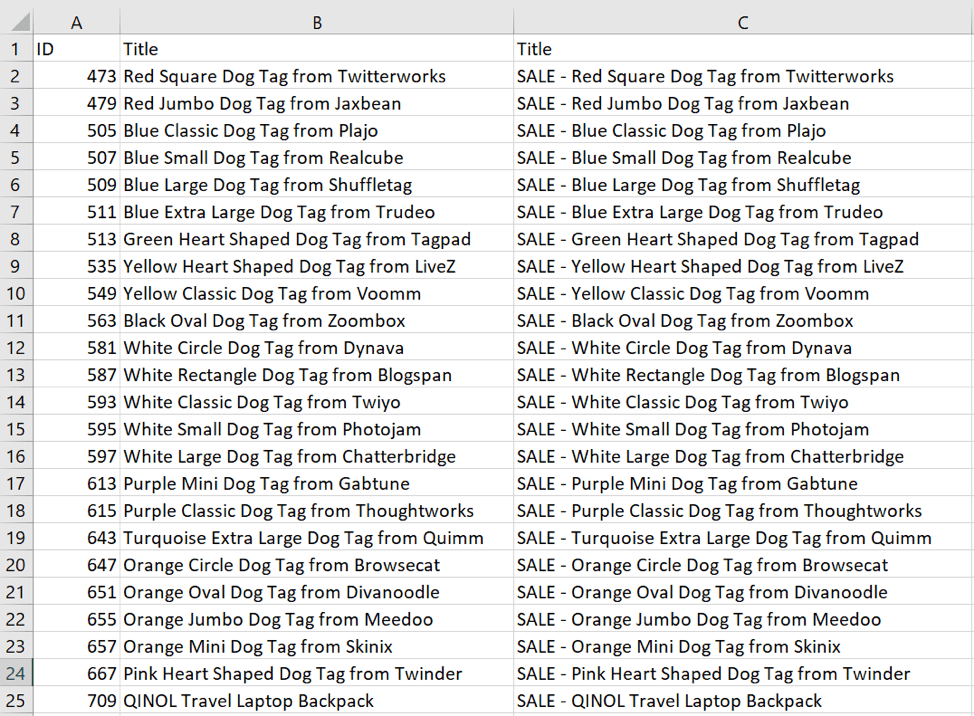
- Now copy the values from your new Title column to your old Title column but paste them as values to get rid of the formulas.
- Delete your new Title
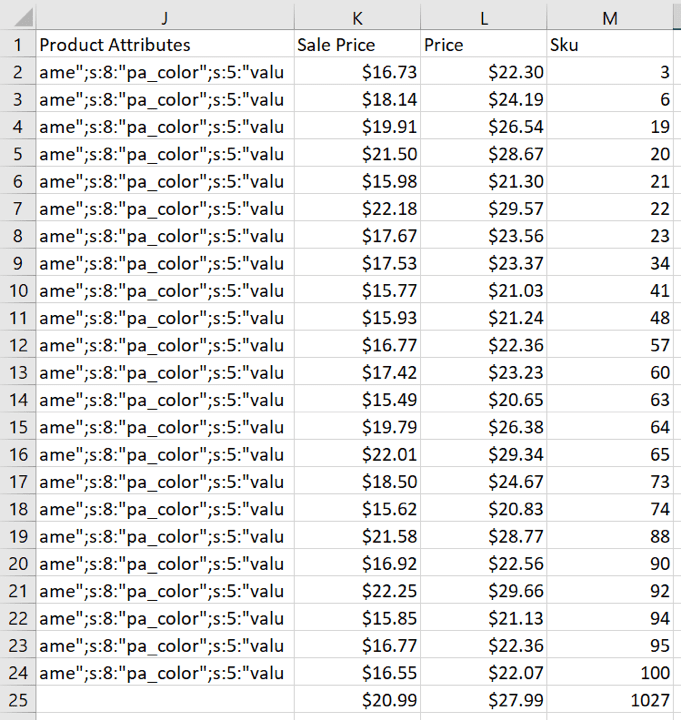
- In the first data row (Row 2 in our spreadsheet) of the Sale Price column (column K in our spreadsheet), enter this formula: “= L2*0.75” but without the quotes. This will set the Sale Price to equal 75 % of the Price
- Copy and paste the formula to all rows of the Sale Price
- Format the Sale Price and Price columns to 2 decimal places. They should now look like this:
- Save your spreadsheet.
Step 3: Import the Changed Spreadsheet
Similar to its prior import history, WP All Export also keeps track of prior exports and can use this information to manage related imports.
Click All Export -> Manage Exports to open the Manage Exports screen:
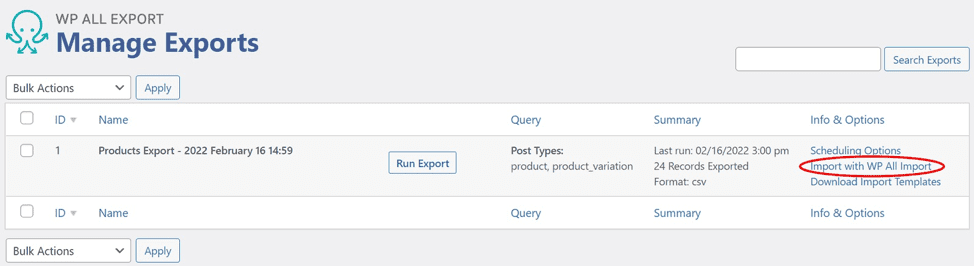
Under the Info & Options section of the row representing your previous export, click Import with WP All Import.
In the New Import screen…
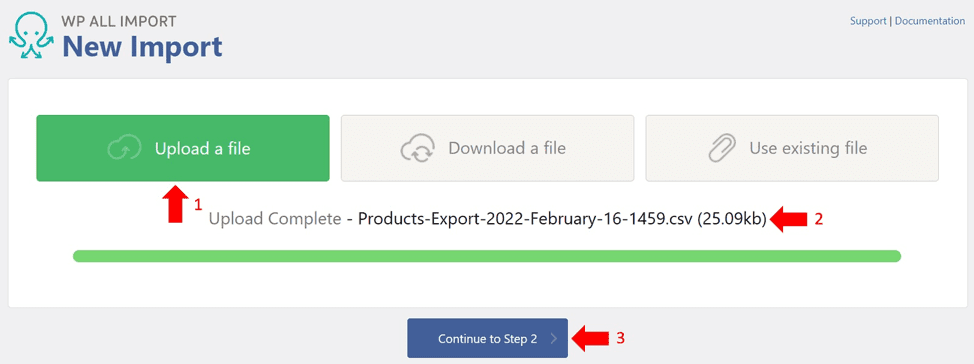
- Choose Upload a file.
- Upload your spreadsheet.
- When the upload finishes, click Continue to Step 2.
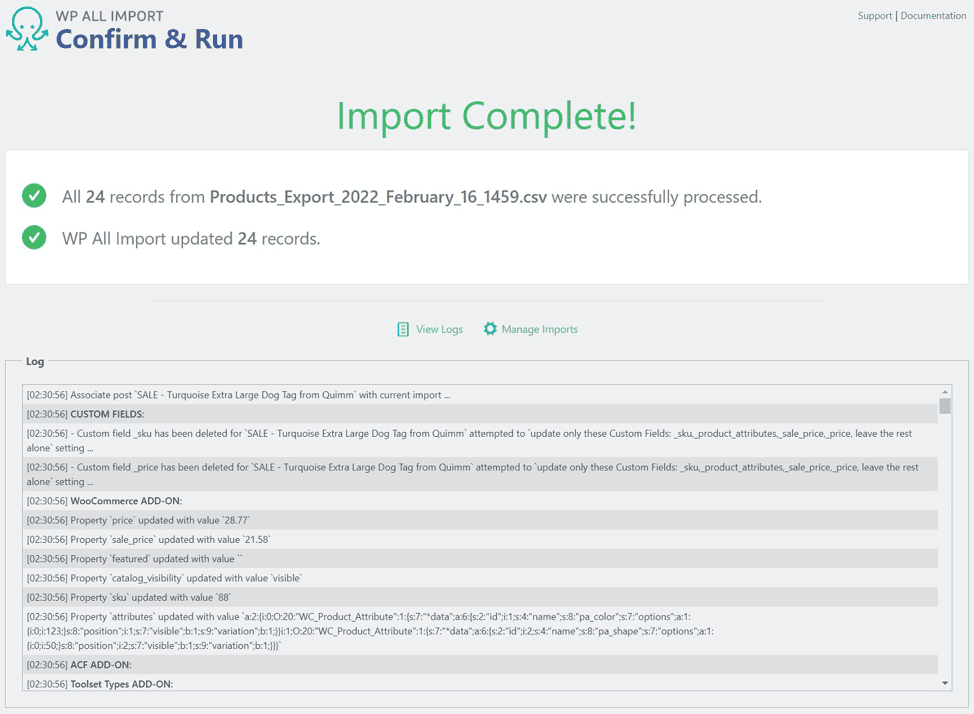
Hit the Continue buttons for all remaining screens until you reach the Confirm & Run screen. There, click the Confirm & Run Import button.
When your import finishes running, your confirmation screen should look like this:
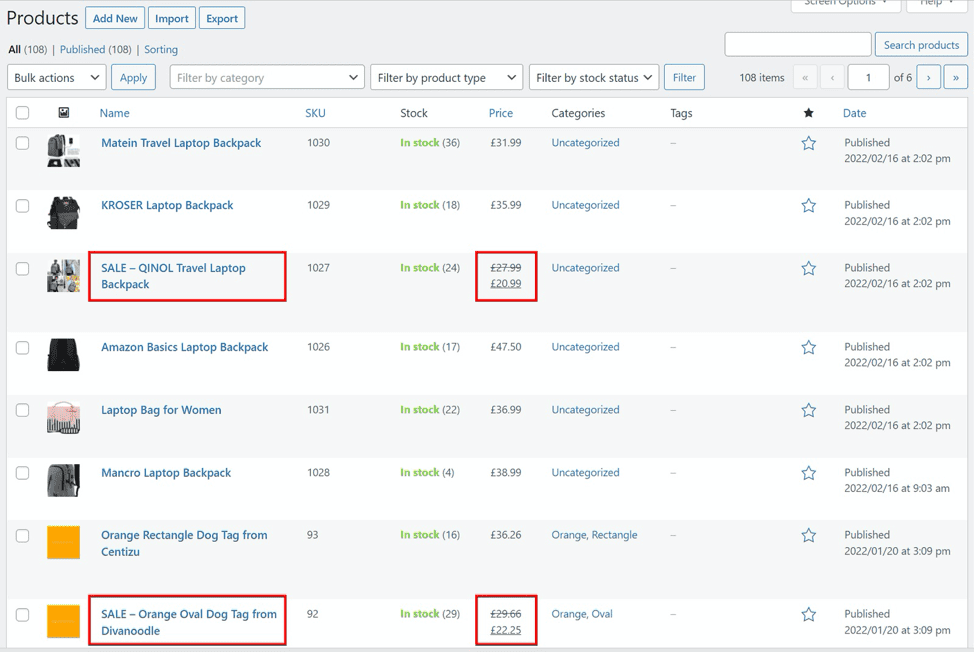
Navigate to Products -> All Products.
If you now check the affected products in WooCommerce, you will find that any product with a Price between 20 and 30 is now on sale with a discount of 25 %.
You may have noticed that some of the screens that you bypassed had considerable information on them. How did WP All Import automatically populate all those screens?
When you ran your initial export, WP All Export recorded all your settings. When you ran a related import, WP All Import accessed those settings. This is just one example of the benefits of using integrated plugins to handle all your WooCommerce Import and Export needs.
For more information on bulk editing product data, see Easily Bulk Edit WooCommerce Products in Excel.