In a world where actions speak louder than words, product demos have emerged as one of the most effective tools for businesses, creators, and marketers. A good product demo does not merely tell—it convinces, engages, and inspires action. Whether you’re demonstrating a tech gadget, software, or even a pair of shoes, how you demonstrate it matters.
That is where CapCut Desktop fills the niche. Having previously been a mobile app for quick cuts, CapCut has upped its ante with its desktop iteration, providing a user-friendly yet surprisingly powerful video editing application. And the cherry on top? It doesn’t cost anything. Plus, if you’re looking to enhance your videos further, CapCut also makes it easy to add features like text to speech for an even smoother presentation.
In this article, we’re going to guide you through a step-by-step tutorial on how to produce spotless, professional-grade product demos with CapCut Desktop, divided into five key steps of operation, with some additional tips and tidbits in between.
Why Use CapCut Desktop Video Editor for Product Demos
Before we dive into the “how,” it’s helpful to know why CapCut Desktop Video Editor is so amazing for product demo videos:
Easy-to-Use Interface: No need to be a video expert to navigate.
Powerful Features: From screen capture to animations and voiceovers, everything is included.
Templates and Effects: Streamline your production quality with the assistance of drag-and-drop features.
Free to Use: No watermarks, no monthly payment. Just export and edit. And that means, if you have a product to market, CapCut could be your best-kept secret.
How to Create a Product Demo Using CapCut Desktop Video Editor
Step 1: Organize and Import Your Footage
The first principle of a successful product demo? Structure and clarity. Before you roll out CapCut, decide what you are presenting. Is it a hands-on demo, a tutorial, or a benefits presentation?
Once you have mapped it out, open CapCut Desktop and create a new project. Click “Import” and bring in all your assets: product clips, screen recordings, images, audio, and more. Drag your main video(s) onto the timeline.
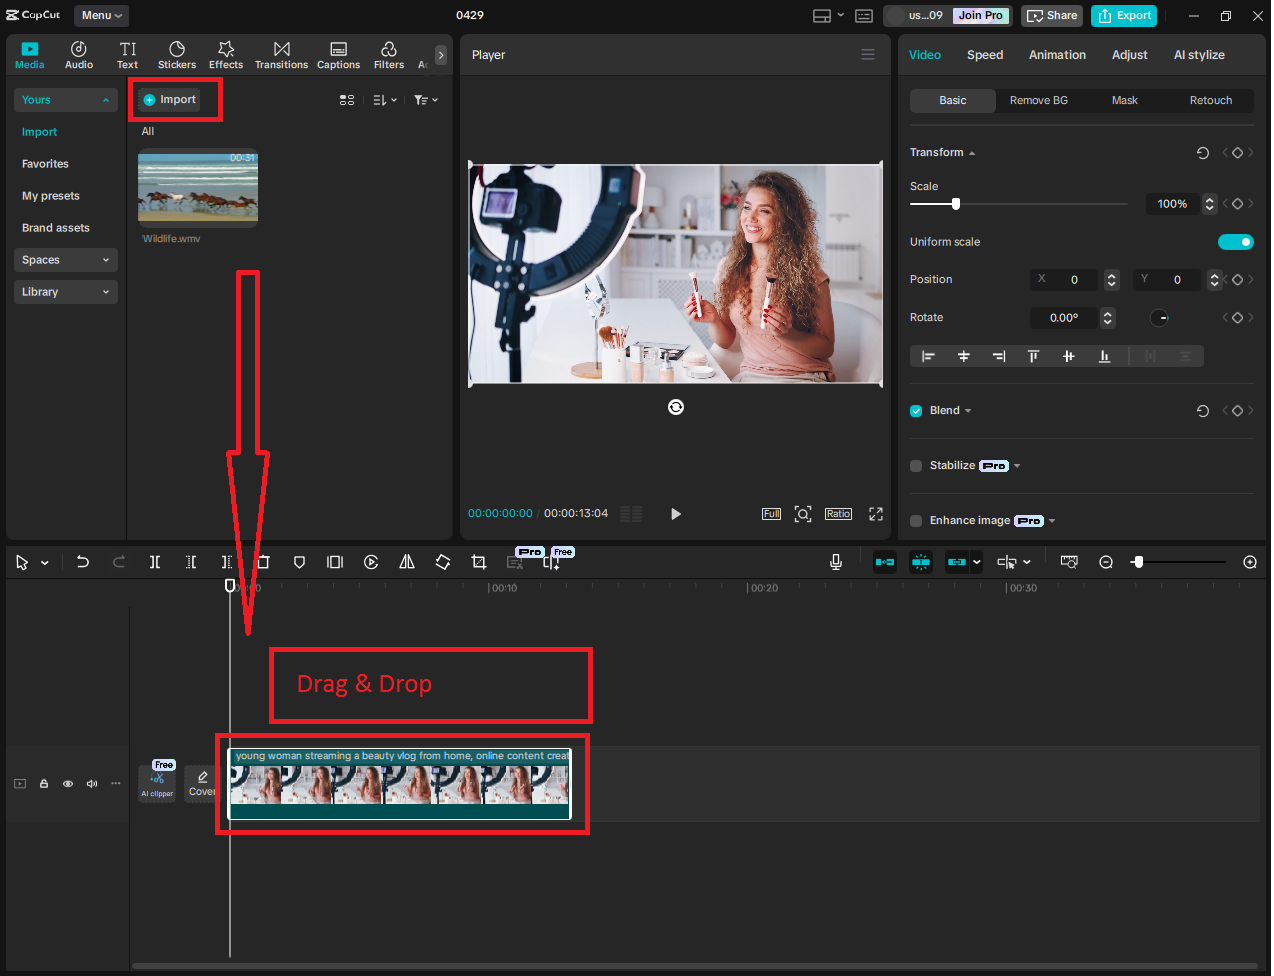
Pro Tip: Name your files clearly when importing, particularly if your demo covers multiple angles or product options.
Bonus Tip: If you have software walk-throughs or presentations in your demo, use the screen recording function in CapCut or record your screen from outside and import.
Step 2: Organize and Edit Your Footage
This is where your raw footage starts to take shape. The goal is to organize your video into logical, bite-sized chunks for clarity and flow. Begin by removing any unwanted clips or bloopers using the Split tool (Ctrl + B). Next, rearrange your clips into a coherent sequence: start with an introduction that answers “What is the product?”, follow with a demonstration showing “How does it work?”, and finish with a strong call to action such as “Try free now” or “Buy now.” Keep everything brief—viewers can quickly lose interest if the demo drags on.

Tip: Use the text tool to add chapter headings to direct the viewer. For instance, “Step 1: Powering the Device,” or “Feature Spotlight: Noise Cancellation.”
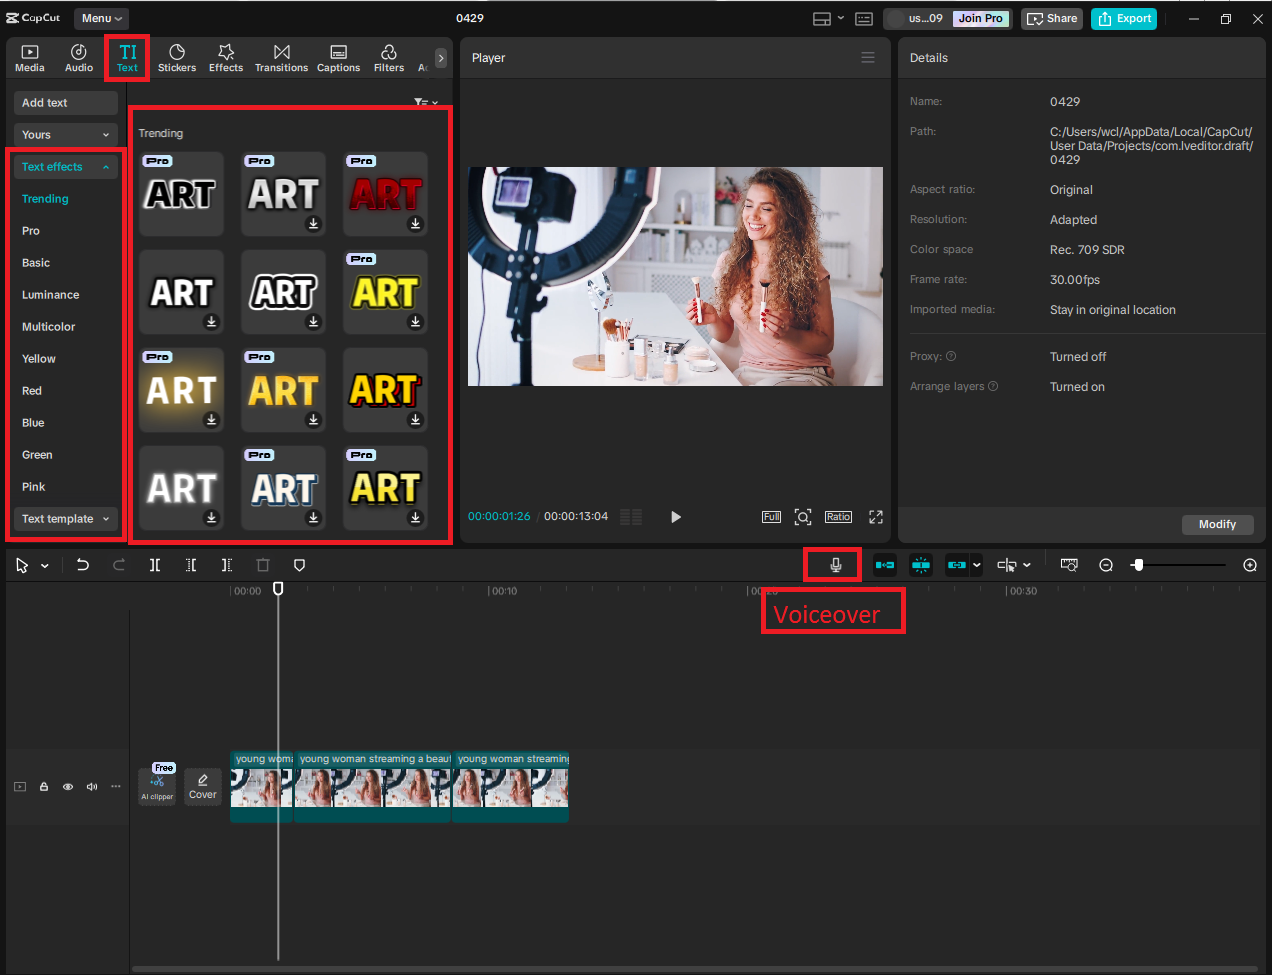
Step 3: Add Text, Annotations, and Voiceover
This is where the magic occurs. A good product demo does not just show, it teaches. You must ensure that every feature is well understood and remembered. Tools like CapCut’s integration with an AI video generator can help speed up the process by creating scenes and visual assets automatically, saving you a lot of time. To add text and annotations to your video, switch to the Text tab and choose either Default Text or Preset styles. These are useful for labeling feature names, outlining step-by-step instructions, highlighting specifications or prices, and customizing fonts, sizes, and colors to match your brand. For added emphasis, use text callouts to draw attention to key points, such as “Battery lasts up to 12 hours!” If you’d rather let your demo speak, navigate to the Audio tab.
You can record your voice in real time by selecting the “Record” option or uploading a pre-recorded audio file. Carefully sync the voiceover with your visuals by sliding the audio clip along the timeline. A friendly, clear narration can make your demo feel more personal and professional.
Step 4: Incorporate Effects, Transitions, and Zoom for It to Get Interesting
Even the best product demo can fall flat if it turns into a video snooze-fest, but CapCut helps keep things engaging with powerful, easy-to-use built-in features. To add smooth flow between scenes, click on the area between two clips and open the Transitions tab. From there, you can choose subtle effects like swipes, fades, or zooms—simple transitions are often enough to maintain continuity without becoming distracting.
For more visual interest, head to the Effects tab. You can use glow or spotlight effects to emphasize certain sections, apply motion blur to make product spins appear smoother, or add background blur to draw attention to product details.
When highlighting smaller features or user interface elements, use the Zoom-in effect from the Animations panel. By setting keyframes, you can control exactly where and when the zoom happens. Subtle pans and zooms help guide the viewer’s eye to the most important parts of your demo.
If you want even more flexibility with your audio, CapCut allows you to integrate a voice changer feature, giving your demo a fun or more polished sound depending on the vibe you’re aiming for.
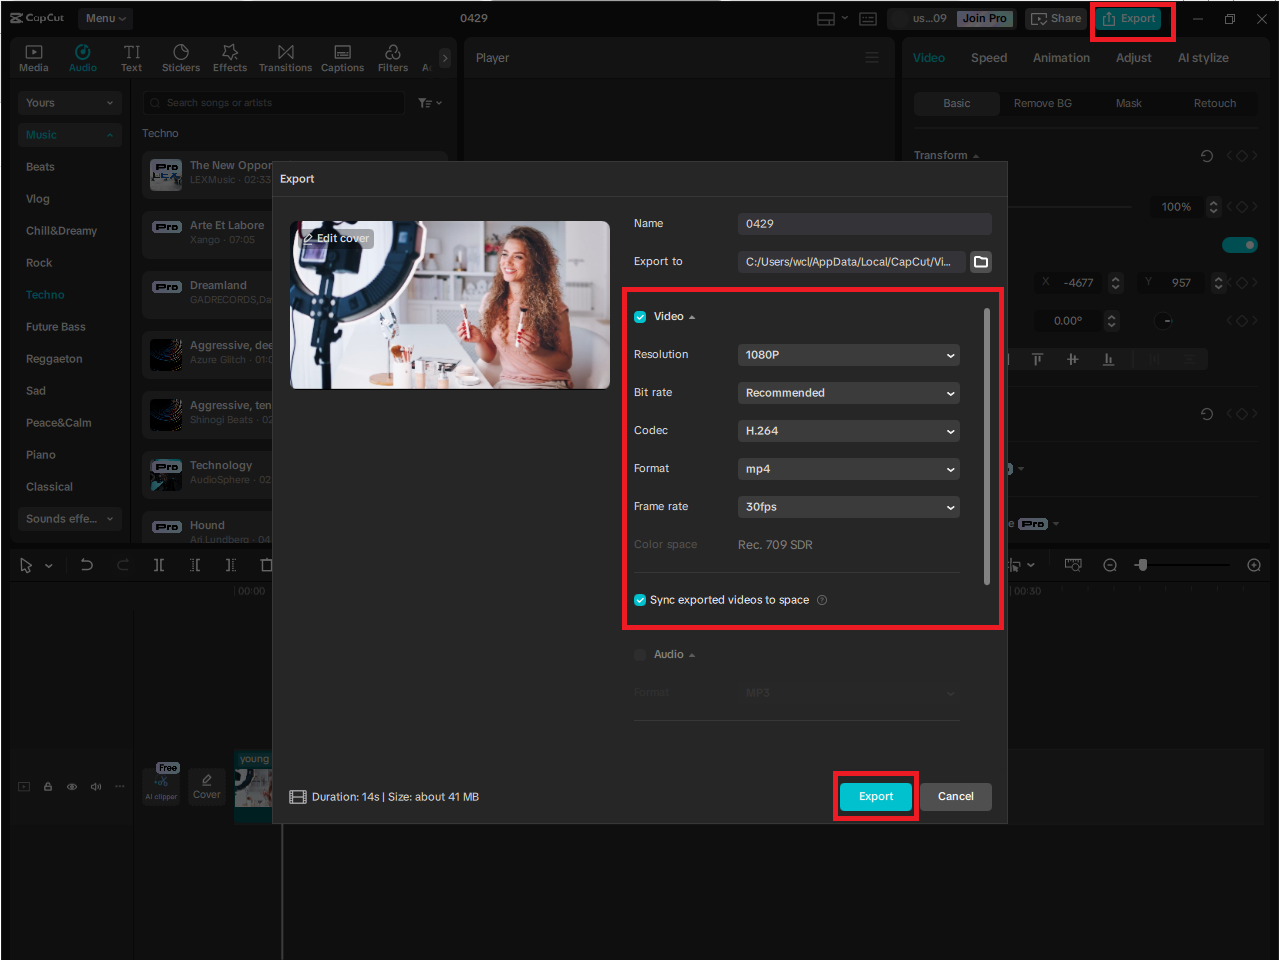
Step 5: Final Touches and Export
Before finalizing your product demo, take a moment to polish the finishing touches. Start by adding background music through the Audio tab, where you’ll find a selection of royalty-free tracks. Choose something upbeat, but not too overpowering. Use keyframes to adjust the volume and create smooth fade-ins and fade-outs for a professional touch. Next, reinforce your branding by importing your logo as a PNG file with a transparent background. Place it in a corner of the video using the Overlay track to serve as a subtle watermark.
When you’re ready to export, click on the Export button in the top right corner. For the best results, choose a resolution of 1080p or 4K, select MP4 as the format for web use, and set the frame rate to 30 fps or 60 fps for smoother motion. Finally, give your file a clear, descriptive name and be sure to save a backup copy.
Final Thoughts
Making product demos may seem daunting at first, but with CapCut Desktop, it’s a simple, easy process that’s even enjoyable. In five simple steps, steps—planning and importing, organizing your footage, providing context, making it visually engaging, and wrapping up the project- you can transform raw footage into a compelling, conversion-focused product demo.